I actually made it to the club on a Saturday (quelle horreur!) and was given a game by Andrew B, master of Cold Steel and creator of the
Dennewitz scenario. I am a naturally defensive player, so I need to practice at being a bit more agressive on the table-top, so Andrew complied, by coming prepared with Russians and playing a more defensive game.
When I say 'defensive', he still gave me a spanking with his cavalry and wasn't shy in exploiting my failures, though he was decent enough to point out faults in my moves before I committed to them, giving me the option of changing my mind. It was in the responses brought about by chance, like when I attempted to form square and failed (3 times!) that he ruthlessly exploited the opportunity!
My pictorial record of the game begins about a third of the way in due to my neglecting to check if the SD card was in the camera (it wasn't!) and then only remembering that my smart phone has a pretty decent camera in it once the game was well under way!
 |
"You forgot to check the SD card? Then you forgot to use your phone? Seriously?"
|
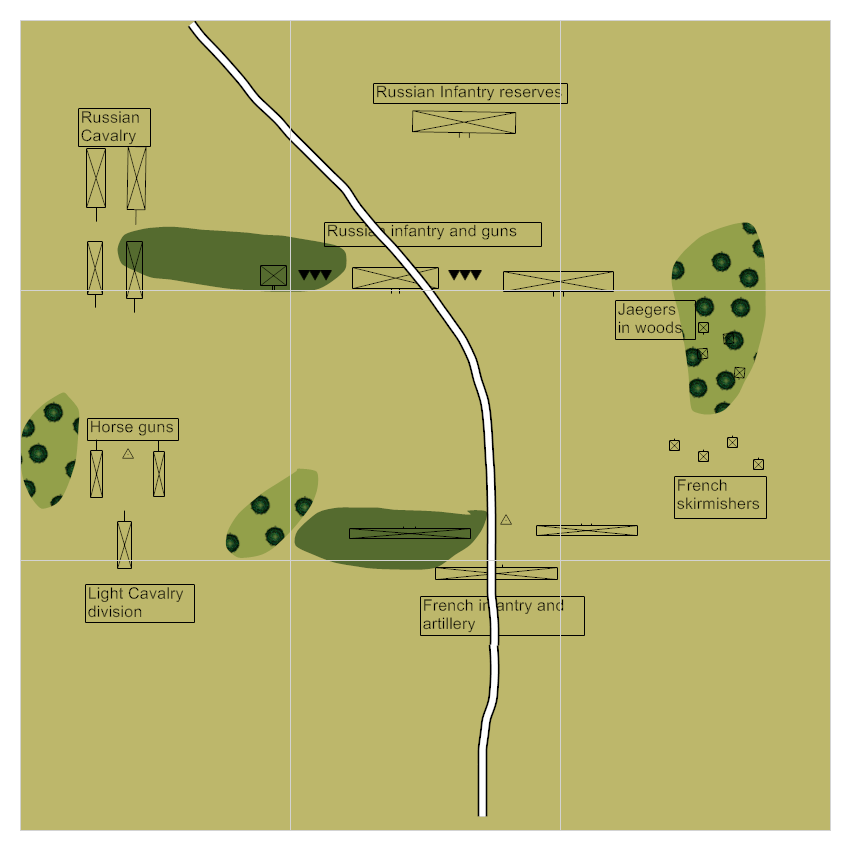
Anyhoo, the game started off with my light cavalry division facing Andrew's on the left flank and the infantry lined up in the centre to the right, with a light infantry battalion in skirmish order to counter his jaegers in the woods. I'd gone for another infantry-heavy formation with only one 6-lber foot battery and another 6-lber horse battery. As it was a 2000 point game I had 21 battalions at my disposal with about half rated veteran.
 |
| Starting positions |
Andrew gave me the initiative as I was the attacker so I started with my elite light troops attacking their Russian counterparts in the woods. The disparity in morale ratings meant my skirmishers forced his back with losses. In the next turn I'd cleared the woods, formed up in column and brought another light infantry battalion up into the woods to threaten the flank of the brigade closest to the woods.
I advanced my front brigade up in column in preparation for a charge. Originally, I was going to charge across the line, but Andrew pointed out that that by targeting the charge against the weakest point, in this case a line, I'd have a better chance. Also, if I'd concentrated my columns beforehand I'd be even more likely to have succeeded. As it was I held one battalion back because it had copped many casualties protecting the rest of the brigade from artillery fire, and didn't want to wait another turn faffing around getting myself properly concentrated. So I went in half-cocked with only 4 battalions, rolled poorly and paid the price: my columns refused to go through with the charge, halting at 2" with 2 disorders! In the inevitable counter attack, two of my battalions broke, while the other two retreated.
The rest of the brigade moved up to stop the rot, but in doing so, found themselves in a pretty pickle. Andrew's uncommitted cavalry regiment came over the rise to threaten the flank of my advance. I got the left flank battalion into square, hoping to protect the rest of the brigade as they prepared to charge to their front. Of course Andrew wan't going to let me do that unmolested, though! He gave the square some curry with the artillery at close quarters, then charged the square with a battalion of Jaegers. Goodbye square! This was the signal for his cavalry to charge. Ordinarily, I would have had better than even odds to form square in reaction to the charge from that distance, but 4 battalions all failed to take the opportunity, resulting in a minor disaster for the centre and elevated blood pressure for me! This left my left flank exposed to enemy cavalry while to my front enemy infantry prepared to counter attack after my disastrous charge. Any offensive action in the centre by me would have to take into account all the negatives of breaking and retreating infantry. Not a good place to be!
 |
| Breaking infantry reach the edge of the world! Only one actually fell off; the others rallied to the general's call. |
I did exact some revenge, turning one battalion into the flank of the cavalry and firing. I don't think I inflicted a casualty, but I caused enough panic to get them breaking to the edge of the board. For the moment, they didn't feature in the game, but they did return later to cause a headache!
 |
| Nasty cavalry cop what they deserve; a flank shot! |
Meanwhile, my cavalry were being pushed back in a series of charges, counter charges, flanking actions and musketry. I always expected a tough time as Russian cavalry has the wood over French cavalry in quality, and as we were evenly matched in numbers, I was at a disadvantage. Andrew wasn't playing to destroy my cavalry, only to bottle them up, which he did very well.
 |
| More nasty Russian cavalry |
 |
| My hussars and a chasseur regiment retired to lick their wounds, while my other chasseur regiment lurk on the Russians' flank... |
 |
| ...in case they tried to charge, which of course they did! |
 |
| My charge collected the nearest regiment in the flank, stopping them in their tracks... |
 |
| ...but the other continued on into my stationary cavalry line who attempted to empty a few saddles with musketry. |
 |
| Didn't work, though! |
 |
| In the end, Andrew saw off my pesky chasseurs with a frontal charge with one of his hussar regiments |
 |
| The remaining French cavalry well and truly bottled up. |
Back in the centre, the two surviving battalions were desperately back-peddling to get out of the way of Andrew's advancing infantry, who followed up, closing the gap. They were sent on their way after a bruising firefight, but kept in good order to return to the fray at a later stage.
 |
| The aftermath of my disastrous charge: out of 4 battalions, one is left in front of the Russian line, one is repulsed and two have broken and fled |
 |
| The two remaining battalions attempt to extract themselves with artillery support |
 |
| Jaegers advance off the hill to try to flank my central force. |
 |
| The main Russian line follows my retreating battalions... |
 |
| ...who are helped on their way by a volley... |
 |
| ...until they catch up with the main line. Artillery at close range, anyone? Yes please, tovaritsch! |
 |
| The general successfully rallies the broken brigade! |
As Andrew started to move his reserves forward, it was obvious I needed to do something to take the pressure off the centre. The time was ripe for a charge by the right hand brigade. This time I applied the lessons of my first failed attempt at a charge and concentrated the battalions beforehand. With the light infantry in the woods, Andrew was forced to deploy one battalion to protect the flank facing the woods, removing it from the response to the charge. He counter charged with 3 battalions to my 5 and with artillery support was lucky to get away with a minor defeat, forcing him back 12", but still in relatively good order.
 |
| On the right flank, the french gear up for a charge |
 |
| The Russian left flank forms into line to stave off the threat from the woods |
 |
| Both sides charge; The impact was so great it shook the camera! |
The next charge, though, was the real deal! Even though the Croatians on the left got repulsed by artillery fire, the momentum of the rest of the brigade, the fact they were following up a victory and the additional disorders suffered by the Russians ended up in a smashing victory to me! The icing on the cake was that they also went battle-mad, cleaning up the line facing the woods and getting them outside the artillery's arc of fire. HUZZAH!
The light infantry in the woods took the opportunity to apply the coup de grace to the poor old jaegers in a charge out of the woods that sent them packing, despite the negatives suffered for charging in woods. The negatives suffered by the Russians with casualties suffered and by having a whole brigade break within 9" left the result in little doubt, however!
 |
| The stage is set for the second charge. |
 |
| The Croats retreat after taking too many casualties from artillery fire... |
 |
| But it didn't matter; the charge goes home! |
 |
| The jaegers didn't stand a chance after that. |
Back in the centre, Andrew had moved up his infantry and artillery to within close range to try and force a way through the centre. By that stage 6 of the broken battalions had been rallied by the general after much belabouring heads and shoulders with the flat of his sword. If only I could hold on, the situation would stabilise.
It came down to a charge by one of Andrew's jaeger battalions at the reduced column closest to the artillery. It had suffered for being within very close range, so if he could come to grips with it, he should have been able to break it and then break the other 3 with a frontal attack. That was the plan, but the weakened column had other ideas. They loosed off a volley at the charging jaegers that destroyed 50% of their front line, causing them to lose their pre-melee morale check and retreat in disorder! Huzzah!
 |
| Things looked grim in the centre |
 |
| But battered reinforcements were on their way |
 |
| The jaegers charged, but deadly fire from the French column stopped them in their tracks and sent them reeling! |
From then on it became a game of trying to get into each other's flanks in the centre, but with my previously broken brigade coming up in support, Andrew didn't have enough infantry to dislodge me off the hill and mine were in too bad a condition to do much other than hold their position.
 |
| Flank charge, flank charge and another flank charge! |
On the right flank, Andrew was bringing his reserves to bear on my victorious brigade, along with the fourth cavalry regiment which had rallied. With no reserve of my own and no cavalry support, the writing was on the wall: I would have had to break off and withdraw if I was to extract myself from the situation. My cavalry were well contained on the left; my centre was only just holding after being severely knocked around and the right was hanging out in disarray after their successful charges, with no support and ripe for the counter-attack.
 |
| Recipe for victory: break more of your opponent's eggs |
The chief thing I learnt (or really had re-affirmed) is that you can't make an omelette without breaking eggs. In order to achieve anything, some units have to be sacrificed, rather than trying to protect everyone and then having everyone break and run when the static position gets thumped by concentrated forces.
Usually, instead of breaking a couple of eggs the whole tray ends up on the floor! This game wasn't quite the victory I was hoping for (I was playing Andrew B, after all!) but it was a pointer in the right direction.
 |
| "What do you mean you lost the Guard Division?!?" |
 |
| He lost his divisional morale test! |


Another top game report Ben. You still managed lots of photos too!
ReplyDeleteHow different this game would have been if a couple of rolls had been in your favour - your time is coming my friend.
ReplyDeleteFight on, Rosbif; great report.
ReplyDeleteThat's the key to victory!
ReplyDeleteRafa
A great report, and some things to ponder...
ReplyDeleteHey Biffo I think you might be getting the hang of this game.
ReplyDelete